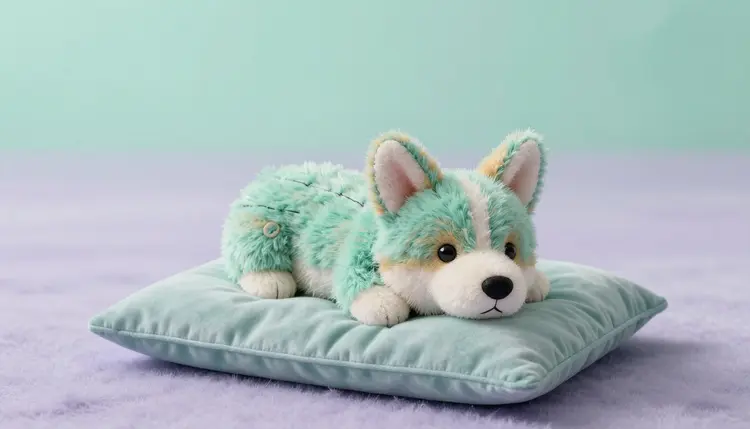
A plushie photo takes the picture you already have, a selfie, a portrait of your dog, a snapshot of the cat asleep on the laundry, and rebuilds the subject as a stuffed toy: stitched seams, button eyes, fuzzy fabric, the same colors and roughly the same expression. It is a small, silly, shareable thing to make, and an image editing model can do it from one photo and one sentence.
Plush filters in social apps give you one look, applied to whatever you feed them. An image editing model is looser and more useful. You say what kind of toy you want, what material it is sewn from, whether it sits on a bed or a shelf, and it redraws your photo accordingly. The same dog can come back as a felt stuffed animal, a crocheted amigurumi or a worn vintage bear, and you pick the one that feels right.
The people who make these are mostly doing it for the same few reasons: a gift for someone who loves their pet, a profile picture that is not a headshot, a card or a sticker with a character that is recognizably theirs, or a design reference before ordering a real custom plush from a maker. Picasso IA puts several image editors behind one interface, so you can run the same photo through more than one of them and compare. New accounts get free credits to try it, and the full catalog is open if you want to see what else can edit a photo.
One boundary up front. Use your own photo, your own pet, or a fictional character. The point of the page is the toy version of you or your animal, not a way to turn strangers, coworkers or public figures into dolls. If a photo shows another person, get their say-so before you generate anything from it.
The job is an edit, not a fresh image: the model must keep the identity of the photo (the markings on a cat, the shape of a haircut, the tilt of a head) and change only the material. That favors models built to take a reference image plus an instruction. Three on Picasso IA fit well, and they are worth running side by side because each one drifts in a different direction.
google/nano-banana-pro accepts up to 14 reference images with the prompt and renders at 1K, 2K or 4K, so it is the one to try when you want to show the model several angles of the same pet or want a close, detailed result. picassoia/picassoia-image-editor-pro takes up to three images and lets you point at each one in the prompt as image 1, image 2 and image 3, which is handy when one photo is the subject and another is a plush you want to match. openai/gpt-image-2.5-flare edits a photo from a plain instruction, can return several variants from one prompt, and can export a transparent background, which matters if the plushie is headed for a sticker or a card.
Run the same prompt through two of them and keep the one whose face looks most like the original. There is no permanent winner. Fur patterns, glasses and small accessories land differently from model to model and even from photo to photo.
Material vocabulary does most of the work in a plushie prompt. A toy is defined by what it is sewn from and how it is stuffed, so name the fabric and the construction rather than just writing cute stuffed toy. These are starting points to adjust, not formulas.
| Plush look | Prompt words that steer it | Works well for |
|---|
| Classic stuffed animal | hand-stitched felt, button eyes, visible seams, soft cotton stuffing | Pets with clear markings |
| Minky fleece | ultra-soft minky fabric, plump rounded body, embroidered nose | Cats and short-haired dogs |
| Crochet amigurumi | crocheted yarn, tiny even stitches, round limbs, safety eyes | Full-body portraits |
| Vintage teddy | worn mohair, faded fur, loose threads, warm shelf lighting | Selfies as a keepsake |
| Patchwork felt | patchwork felt pieces, embroidered face, flat colors | Stickers and simple graphics |
Two habits help. Describe where the toy sits (on a pastel pillow, on a bedroom shelf, held in a hand) so the model builds a small scene instead of pasting the toy onto your old background. And keep one line about the original: same fur colors, same ear shape, same expression. Without it, the model invents a generic bear and your dog vanishes. The effects page has preset looks if you would rather start from a style someone already tuned.
This is the whole route from one photo to a finished toy image, using the models above and nothing outside Picasso IA.
- Pick a clear photo. One subject, face visible, even light, not blurry. A pet looking toward the camera beats a profile shot, and a plain background gives the editor less to confuse.
- Open the toolkit and choose an image editor. In the toolkit, select google/nano-banana-pro, picassoia/picassoia-image-editor-pro or openai/gpt-image-2.5-flare and attach the photo as the reference.
- Describe the plush and what must stay. Name the fabric, the eyes, the stitching and the setting, then add the identity line: same colors, same ear shape, same expression as the photo.
- Generate a few variants and compare. Ask for more than one result or run a second model, then lay them next to the original and judge the face first, the fabric second.
- Refine one thing at a time. Feed the best result back in with a single change: softer fur, bigger eyes, a different pillow. Changing three things at once usually undoes the likeness you just got.
Most failed plushies fail the same way: the prompt describes a toy and forgets the subject. A prompt that says cute plush dog gets you a cute plush dog, just not yours. Anchor it. Mention the coat colors, the white patch on the chest, the one ear that folds, the glasses. Then say what to keep and what to change in separate sentences, so the model treats them as different jobs.
Tip: write the prompt as a sewing order, not a caption. Fabric, eye type, stitching, stuffing, then one sentence on what must match the photo. A model that reads a construction spec tends to give you an object that looks sewn, not a toy-shaped filter on the original.
Skip adjectives that pull toward a different animal or a cartoon: chibi, kawaii mascot and similar words often shrink the head and replace the face. If a result looks off, check the eyes first, since eyes carry most of the resemblance in a plush.
Once you have a still you like, it can move. Take the finished image into an image-to-video model such as wan-video/wan-2.6-i2v, ask for a small motion (a head tilt, an ear twitch, a slow blink), and keep the clip short. The walkthrough on turning photos into videos covers the settings. For a pet look with no toy at all, see AI pet portraits.
The idea is simple, the output is not guaranteed. Here are the five places it stops being useful.
- Likeness drifts: the model keeps the colors and the general shape, but eye spacing, ear size and the exact markings can shift between runs, so a face that was close on the first try may lose it on the third edit.
- Small details vanish: glasses, earrings, a collar tag or a specific pattern on a jacket are often simplified or dropped, so check them before you decide an image is finished.
- It is a picture, not a pattern: a plush that looks right on screen may not be buildable as drawn. If you want a physical toy, a maker will need their own spec and photos, so check what they ask for.
- Groups and busy scenes break: two pets or three friends in one photo tend to merge or swap features, so plush one subject at a time and combine them afterward.
- Motion is short and loose: animating the result works for a few seconds of head and ear movement, but stitched seams can wobble and the fabric can look more like fluid than cloth.
None of this makes the tool unusable. It means the first result is a draft, and the second and third pass is where your own eye does the work.
Can I turn a photo of my pet into a plushie with AI?
Yes, and a pet is the easiest subject. Upload a clear photo to an image editor in the toolkit, describe the toy fabric and stitching, and add a line telling the model to keep the coat colors, ear shape and expression. Animals with distinct markings, like a tuxedo cat or a spotted dog, hold their identity best, because the pattern gives the model something specific to preserve across the material change.
Which AI model is best for plushie photos?
There is no fixed best, so compare. google/nano-banana-pro takes many reference images and renders at high resolution, picassoia/picassoia-image-editor-pro handles up to three references that you can address by number in the prompt, and openai/gpt-image-2.5-flare edits from plain instructions and can return several variants at once. Run the same photo and prompt through two and keep whichever face looks closer to the original.
Can I make a plushie version of myself?
You can, as long as the photo is of you. A clear, front-facing portrait with even light works best, and the prompt should ask for the toy to keep your hairstyle, hair color and any glasses. Expect the face to be simplified, since plush toys have stitched or embroidered features. If the resemblance feels weak, try a photo with a more neutral expression and fewer accessories, then add the details back one at a time.
Can I use someone else's photo?
Only with that person's permission, and the page is not built for it. Plushie photos work best on yourself, your own pet or a fictional character. Turning a stranger, a coworker or a public figure into a toy raises consent and likeness problems that no model setting fixes. If a photo includes friends or family, ask them first, and keep anything you generate out of places where they would not expect to find it.
Why does the plush not look like my pet?
Usually the prompt describes a toy and forgets the animal, or the photo gives the model too little to work with. Add specifics: coat colors, markings, ear shape, eye color. Use a sharper, better-lit photo with the face toward the camera. Avoid words like chibi or kawaii, which tend to reshape the face. Then try a second model, because identity holds differently from one editor to the next.
Can I animate the plushie afterward?
Yes. Take the finished image into an image-to-video model such as wan-video/wan-2.6-i2v in the toolkit and ask for a small movement, like a head tilt or an ear flick. Short clips hold together best. Longer ones can make the stitching wobble or turn the fabric into something that moves like liquid, so keep the motion modest and judge the first seconds before generating more.
Can I get a real plush toy made from the picture?
The image alone is not a manufacturing file. A custom plush maker has its own process, usually reference photos from several angles and a spec of its own, and each one states what it accepts. Use the AI image as a visual reference for the look you want, then check the maker's current requirements before ordering. Expect the real toy to differ from the render in proportions and fabric.
How do I get a transparent background for stickers?
Ask for it at generation time with a model that supports it. openai/gpt-image-2.5-flare can export a transparent background, which suits a sticker or a card. Otherwise generate the plushie on a plain, contrasting background and run it through a background removal model afterward. The page on stickers and emoji packs covers the sizing and consistency side.
Do plushie photos work for groups or family portraits?
Poorly, in most cases. With two pets or several people in one frame, features tend to merge or swap between subjects. A more reliable route is to make one plush per subject from a separate photo, in the same material and setting, then combine the results in an editor. Using the same wording for each keeps the set looking like it came from the same shelf.
How much does it cost to make a plushie photo?
Each generation costs credits, and the cost depends on the model and the settings you pick, so any number written here would go stale. New accounts get free credits to start with, and an image edit sits at the cheaper end compared with video. Current plans and rates are on the pricing page, which is the only place worth trusting for figures.
Your photo already has a plush version in it. Open the Picasso IA toolkit, attach it to an image editor and see which fabric suits the face.